Old red brick gives buildings warmth, texture, and history that newer materials can’t match. Restoring it properly helps protect that character while ensuring strength and longevity. With the right tools, materials, and methods, you can preserve original masonry without losing its story.
At New Orleans Brick & Stone, every reclaimed brick is chosen for its integrity and heritage value. The company’s work supports builders, preservationists, and homeowners who care about architectural authenticity and responsible restoration.
This guide explains how to inspect, repair, and repoint old red brick walls. You’ll learn how to recognize damage, choose proper mortars, and maintain your brickwork for decades—all while keeping its historic beauty intact.
Understanding Old Red Brick Restoration
Old red brick adds unique character but also requires maintenance. You must assess structural condition, surface and mortar issues, and whether reclaimed red brick matches your building’s original materials.
Historical Significance and Common Uses
Old red brick, often from the 19th and early 20th centuries, was used for load-bearing walls, façades, chimneys, and garden structures. Regional variations in color and size come from local clays and firing methods, affecting texture and appearance.
These bricks were laid in patterns like English bond, Flemish bond, and running bond, which influence how walls carry loads. When planning repairs, match bond patterns and brick types to maintain structural integrity.
Preserving original bricks keeps architectural authenticity and often retains softer mortars that protect the bricks. Match decorative headers, soldier courses, and corner quoins precisely when sourcing replacements or reclaimed units.
Understanding Historic Brickwork and Mortar
According to the National Park Service, older bricks were made softer than modern types, and their strength depended on flexible, lime-rich mortar. Matching that composition is vital for preservation—modern cement mortars can trap moisture and damage historic brick.
Studying original mortar color, texture, and tooling ensures a proper match and maintains both appearance and structural balance.
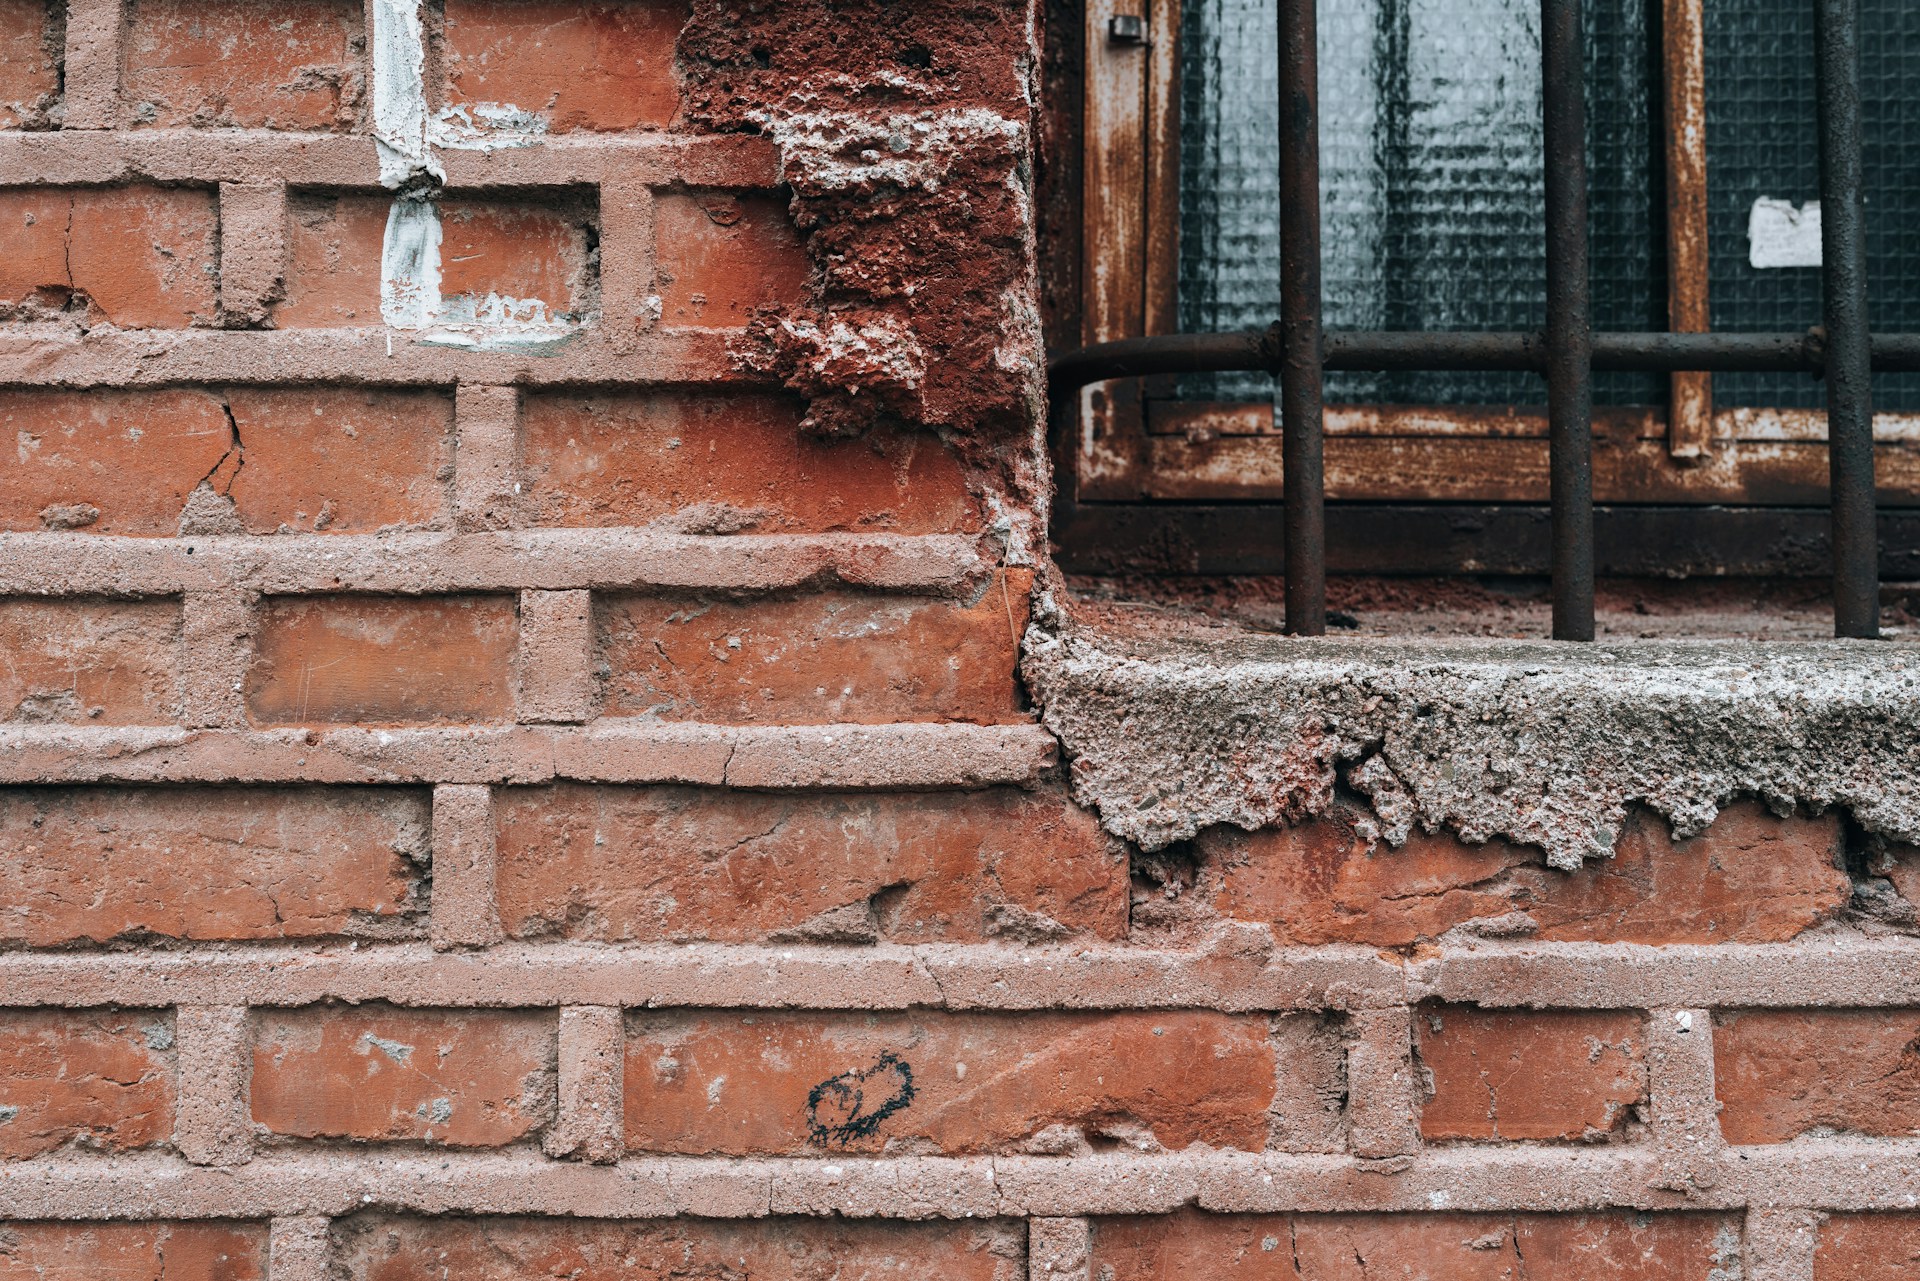
Identifying Signs of Brick Deterioration
Check for structural damage: vertical cracks, bowing walls, and failed lintels require more than surface repair.
Seek a structural assessment if you see movement, sagging, or large stepped cracks. Inspect for spalling, flaking surfaces, and deep erosion, which signal freeze-thaw damage or prolonged moisture exposure.
Inspect mortar joints for soft, powdery, or missing mortar. Hard mortar can crack bricks. Test porosity by dabbing a wet fingertip on a cleaned area; slow absorption or flaking means the brick may be compromised. Document defects with photos and notes before starting repairs.
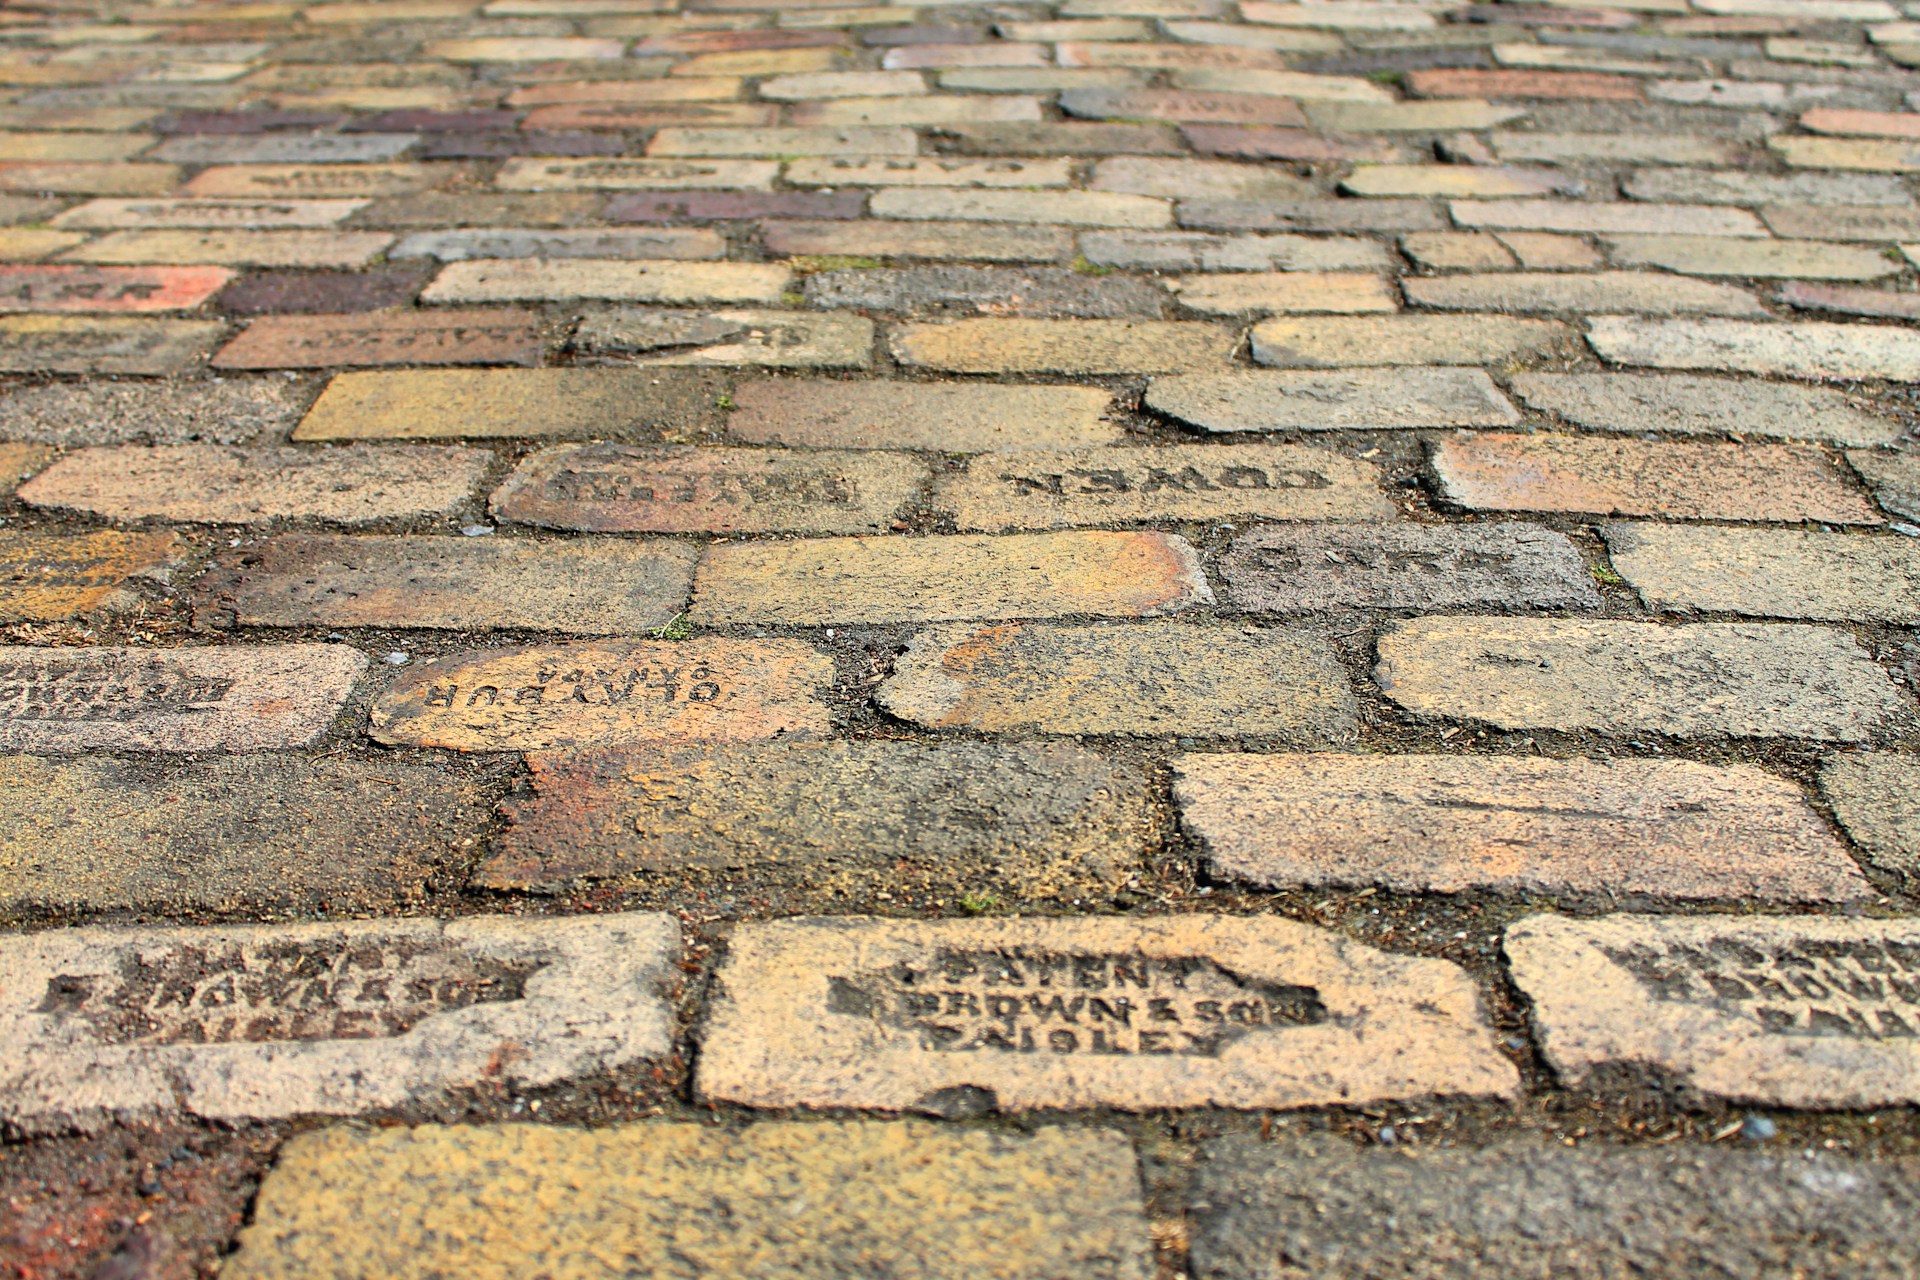
Choosing Authentic Reclaimed Bricks
When using old red recycled bricks, prioritize physical and visual match. Match size, face texture, hand-molding marks, color variation, and fired “skin.” A good supplier can provide samples and details about reclaimed batches.
Sort reclaimed bricks on-site to avoid mixing incompatible units. Use only bricks in good condition for exposed or load-bearing areas. Always use lime-based mortars that are softer than modern Portland mixes to preserve the brick. Keep records of batches and sources for future consistency.
Assessing Condition and Preparing for Restoration
Document visible damage with photos and notes. Focus on areas with crumbling mortar, loose bricks, water stains, or salt deposits to prioritize repairs.
Inspecting Brickwork and Mortar Joints
Walk the perimeter and take close-up photos of mortar joints in natural light. Look for mortar that is soft when scraped, recessed more than 3–4 mm, or missing—these need repointing. Measure joint depth and profile; matching the original helps maintain appearance and weather resistance.
Map wall elevations where joints are failing. Sample mortar for color and composition if you plan to match mixes. Hairline cracks along mortar lines often mean mortar shrinkage. Note any areas patched with modern Portland-rich mixes, as these can trap moisture and damage bricks.
Spotting Loose Bricks and Spalling
Tap suspect bricks with a small hammer; a hollow sound means internal voids or loss of bond. Mark bricks that move or crumble at the edges for replacement. Spalling appears as flaking or breaking of brick faces, exposing aggregate or a darker core.
Random spalling often results from freeze-thaw cycles or poor-quality brick. Loose bricks near openings can signal movement or settling—inspect nearby structural elements. Plan to remove and replace loose bricks, matching replacements for size, porosity, and color.
Evaluating Moisture Damage and Efflorescence
Trace water stains from the top down to find entry points such as missing flashings, damaged caps, or blocked gutters. Efflorescence appears as white powdery deposits; dissolve a sample in water to confirm salts.
Efflorescence means moisture is moving, but doesn’t always indicate structural failure—fix the water source first.
Check interior walls for damp patches and use a moisture meter on suspect bricks and mortar. High readings near foundations or sills may require drainage improvements or new flashings before repairs.
Record recurring moisture locations so you can address causes before repointing or replacing bricks.
Essential Tools and Safety for Brick Restoration
Gather a set of hand tools, safety gear, and basic supplies to repair old red brick. Use tools that match the scale of the work and always protect your eyes, lungs, and hands.
Must-Have Restoration Tools
Prepare a kit for working on historic red brick: a brick trowel for mortar, a tuckpointing tool or joint raker for mortar removal, a hammer and cold chisel for breaking out bricks, and a stiff wire brush for cleaning.
Bring masonry chisels in several sizes, a small level, a tape measure, a margin trowel, and a pointing trowel. Keep mixing buckets, a mortar board, and a hand broom for cleanup. Choose tools with comfortable grips to reduce fatigue.
Personal Protective Equipment
Wear safety goggles to protect your eyes from chips and dust. Use a dust mask or N95 respirator when grinding mortar or cutting brick to avoid inhaling silica and lime dust. Wear gloves that offer dexterity and abrasion resistance, along with long sleeves and work trousers.
f using power tools, add hearing protection and a face shield. Keep a first-aid kit and water source nearby for dust control and minor injuries.
Using a Brick Trowel, Chisel, and Wire Brush
Hold the brick trowel with a firm grip and use the flat to scoop and spread mortar evenly. Use a 10–12 inch trowel for most work and a smaller pointing trowel for repairs.
With a chisel, position it square to the mortar and tap gently, increasing force only after forming a groove. Always chisel mortar, not brick faces, and remove old mortar to a depth of about 20 mm (3/4 inch).
Scrub joints and brick faces with a wire brush to remove loose particles before dampening and repacking mortar. Use brass or stainless-steel brushes for softer bricks. Brush along joint lines to avoid widening joints or damaging brick faces.
Step-by-Step Brick Repair Techniques
Learn how to remove and replace damaged bricks, clean surfaces, and choose and mix mortar that matches both strength and appearance. Focus on safe removal, proper cleaning, and using a mortar mix that bonds without harming historic bricks.
Removing Damaged Bricks Safely
Protect the area by wearing safety glasses, gloves, and a dust mask, and cover nearby surfaces. Score the mortar joints with a cold chisel or angle grinder to a depth of at least 3/4".
Remove old mortar from the brick and cavity using chisels and a hammer, tapping gently to avoid damaging nearby bricks. Pull the damaged brick straight out; if stuck, cut it into sections and remove the pieces. Clean out debris and undercut the cavity slightly for a solid mortar bed.
Save any reusable bricks and set them aside. Inspect surrounding bricks for cracks and repoint those joints while the cavity is open to prevent future issues.
Cleaning and Preparing Brick Surfaces
Start with a dry brush to remove loose dirt and mortar dust. For deeper stains, use a diluted masonry detergent and scrub with a stiff brush, then rinse with low-pressure water. Avoid high-pressure washing, which can damage historic bricks.
For persistent salts or efflorescence, use a remover made for masonry. Let bricks and the cavity dry until the surface is damp but not wet before adding new mortar. Roughen glazed or smooth replacement bricks slightly to improve adhesion.
Selecting and Mixing the Right Mortar
Match mortar to the original: for soft red brick, use a softer mortar like ASTM Type N or lime-rich mixes.
Hard mortars can cause spalling. Mix to a putty-like consistency—workable but firm. A typical recipe: 1 part hydrated lime, 2–3 parts masonry sand, and enough water for a butterable texture. Preblended lime mortars can simplify mixing and improve color consistency.
Test a small batch on-site for color and workability. Keep mortar covered and discard after it stiffens; don’t add water once set. Apply new mortar in layers, compact well, and tool to match the surrounding joint profile.
Repointing and Brick Replacement Methods
Learn how to match mortar strength to old red brick, replace spalled units, and finish your wall so it looks cohesive from the street. Focus on practical steps and material choices rather than specialized tools.
Repointing Mortar Joints with New Mortar
Test the existing mortar for strength and color. Old red brick usually works best with a softer, lime-based mortar (Type N or similar) so the mortar absorbs movement and moisture instead of the brick.
Remove deteriorated mortar with hand tools—chisels or a mortar rake—to protect the brick edges. Keep joint depths even (typically 1/2 to 1 inch) and clean out all dust before pointing. Mix a compatible mortar that matches the original color and texture; adjust with sand or pigment as needed.
Apply in 2–3 passes for deep joints, compacting each layer with a pointing trowel. Match the joint profile to the original—concave, V‑joint, or flush—and let the mortar cure slowly, shielding it from freeze or direct sun.
Replacing Severely Damaged or Missing Bricks
Replace only bricks that are cracked, crumbling, or causing structural issues; keep originals when possible. Cut out the surrounding mortar and remove the damaged brick without chipping nearby units.
Clean the cavity of all old mortar and dust to ensure a strong bond for the new brick. Find replacement bricks that match in size, color, and texture.
For historic red brick, you may need reclaimed units or custom-made faces. Butter the bed and head joints with soft mortar and set the replacement with a slight slope for drainage. Tool the joints to match adjacent repointing and remove excess mortar before it skins over.
Allow the new brick to cure under the same protection as the repointed joints.
Finishing Touches and Curb Appeal
Once mortar and replacement bricks have cured, clean mortar smears with a soft natural-bristle brush and mild detergent. Avoid power washing or acidic cleaners, as they can damage old red brick surfaces.
Match color and texture where small patches remain visible—use sand, pigment, or limewash sparingly to unify the appearance.
Repoint any remaining loose joints and replace damaged bricks at corners or window sills first, since these areas affect the wall’s appearance most. Consider subtle finishing steps like re-profiling mortar joints and removing biological growth with gentle biocide solutions to enhance curb appeal while preserving the character of the red brick.
Maintenance and Protective Treatments for Red Brick
Keep mortar joints soft, direct water away from walls, and clean gently with suitable products to preserve color and structure. Regular inspections, careful cleaning of painted brick, and choosing the right detergents and sealants help prevent problems like efflorescence and spalling.
Preventing Future Deterioration
Inspect brickwork annually, focusing on mortar joints, flashing, and areas near downspouts. Replace failing flashing, repair cracked mortar with a lime-based mix, and ensure gutters and splash blocks direct water away from the foundation.
Trim vegetation so it doesn’t hold moisture against the brick. Maintain roof and window seals to prevent water infiltration. In freeze–thaw climates, avoid cement patches that trap moisture; use softer, vapor-permeable mortars that match historic strength.
Monitor interior humidity if the brick is inside. High moisture can cause efflorescence on interior faces. Use dehumidifiers or improve ventilation in basements and crawlspaces as needed.
Cleaning Painted Brick and Addressing Efflorescence
Test a small area before removing paint or efflorescence. For painted brick, use low-pressure water (under 500 psi) and a mild masonry detergent; avoid heat stripping or harsh chemicals that can damage brick or mortar.
To remove efflorescence—white powdery salt deposits—brush dry with a stiff natural-bristle brush, then rinse with low-pressure water. If deposits persist, use a diluted masonry detergent for efflorescence, following product instructions and rinsing thoroughly.
Never sandblast or use muriatic acid on historic brick; these methods erode surfaces. After cleaning painted brick, wait 30–60 days of dry weather before repainting or applying protective coatings to let moisture escape.
Choosing Masonry Detergents and Sealants
Choose detergents made for masonry and non-acidic when cleaning historic or soft brick. Look for products labeled safe for clay brick and follow dilution instructions. Always patch test in an inconspicuous area to avoid staining.
Select a breathable, silane or siloxane-based sealant that repels water but allows vapor to pass. Avoid film-forming sealers and acrylic paints that trap moisture. Apply sealants only to clean, dry masonry and follow label guidelines.
Keep a simple log of product brands, batch numbers, and application dates to track maintenance and avoid incompatible chemicals in the future.
Preserving the Past, Strengthening the Future
Restoring old red brick isn’t just repair work—it’s heritage care. Each original brick tells part of your building’s story, and proper restoration keeps that story alive. Using soft mortars, gentle cleaning, and patient craftsmanship ensures strength and authenticity for years to come.
New Orleans Brick & Stone supports preservation projects nationwide by providing genuine reclaimed brick and expert sourcing guidance. Their commitment to authenticity helps builders and homeowners maintain the soul of historic structures while meeting modern performance standards.
Ready to restore your masonry with confidence? Reach out for a consultation and explore reclaimed materials that honor your home’s history and character.
Frequently Asked Questions
This section offers practical tips on finding reclaimed red bricks, price ranges, repair methods for historic masonry, authenticating antique bricks, current market values, and smart reuse ideas for renovation projects.
How can I locate a supplier of reclaimed red bricks in my area?
Check local salvage yards, architectural salvage shops, and demolition contractors specializing in historic properties. Look at online marketplaces and reclamation networks; filter results by location.
Contact local historic preservation societies, restoration contractors, or masonry supply stores for referrals. They often know reliable sources for regionally matching bricks.
What are the common price points for historic red brick for restoration projects?
Reclaimed bricks usually sell by the brick, pallet, or ton. Prices range from $0.75–$4.00 per brick depending on condition, rarity, and demand.
Pallets (about 500–600 bricks) often cost $300–$2,500. Unique or antique bricks may cost more. Remember to include shipping and sorting costs.
Are there special techniques required for restoring old red brick structures?
Use gentle cleaning—hand-brushing with mild detergent—rather than power washing or sandblasting. Match mortar composition to the original (usually lime-based and softer than modern mixes) and replicate joint profile.
Repoint only where mortar is missing or failing, removing old mortar by hand to avoid brick damage. Avoid hard cement patches or sealants that trap moisture.
How do you identify antique bricks for an authentic restoration?
Look for irregular size, hand-mold marks, worn edges, and color variations from firing. Check for maker’s marks, frog impressions, or stamped dates on older units.
Compare dimensions and color to historic photos or local records. Consult a masonry specialist or preservation officer to confirm authenticity if needed.
What is the value of 100-year-old bricks on the market today?
Value depends on rarity, condition, and local demand. Well-preserved, locally sourced 100-year-old bricks usually cost more because they match historic mortar and appearance.
Pay premiums for unique textures, provenance, or bricks from notable buildings. Expect higher prices for matching sets, delivery, and any cleaning or sorting before reuse.
What are creative ways to repurpose red bricks in renovation work?
Use reclaimed bricks for interior accent walls, fireplace surrounds, or kitchen backsplashes to keep historic character. Create garden paths, raised planters, or seating walls outdoors for durable, period-appropriate landscaping.
Cut or tuckpoint bricks to make mosaic patterns, hearth borders, or stair risers. Mix reclaimed bricks with new mortar to blend old and new work and maintain strength.
Schema Markup
Compare dimensions and color to historic photos or local records. Consult a masonry specialist
or preservation officer to confirm authenticity if needed.
What is the value of 100-year-old bricks on the market today?
Value depends on rarity, condition, and local demand. Well-preserved, locally sourced
100-year-old bricks usually cost more because they match historic mortar and appearance.
Pay premiums for unique textures, provenance, or bricks from notable buildings. Expect higher
prices for matching sets, delivery, and any cleaning or sorting before reuse.
What are creative ways to repurpose red bricks in renovation work?
Use reclaimed bricks for interior accent walls, fireplace surrounds, or kitchen backsplashes to
keep historic character. Create garden paths, raised planters, or seating walls outdoors for
durable, period-appropriate landscaping.
Cut or tuckpoint bricks to make mosaic patterns, hearth borders, or stair risers. Mix reclaimed bricks with new mortar to blend old and new work and maintain strength